
ClarkDietrich Wall Type Creator add-In tool for Revit® 2018 - 2022
ClarkDietrich's Wall Type Creator was developed for Architects and Contractors to run inside Revit Architecture or Revit Structural. ClarkDietrich Wall Type Creator develops information-rich wall types, with specific details on UL, STC, LEED and limiting heights.
Jump to:
- Publisher Privacy Policy
- Installing
- Using Wall Type Creator
- Information in Wall Type Properties
- Contact Info
- Version History
- Software License Agreement
- Uninstalling
Publisher Privacy Policy
All information can be found in our web site Terms & Conditions page.
Installing ClarkDietrich Wall Type Creator:
Download the Revit® Add-in from the Autodesk® Revit® Exchange Store. Running this installation file will automatically install the Add-in into Revit® versions 2018 - 2021.
Using ClarkDietrich's Wall Type Creator:
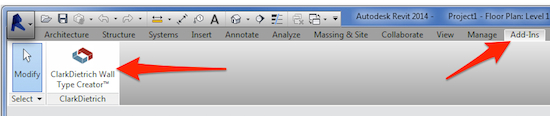
After installing the Add-In, open Revit in your project or in a new project.
- Click on Add-Ins in the Revit Menu Bar (See image below)
- Click on ClarkDietrich Wall Type Creator ™
Once Wall Type Creator Add-In opens, selection filers will be preset to show over 500 wall systems. The below options will help filter your selection down and then build your wall type.
Step 1 – Select wall lookup filters:
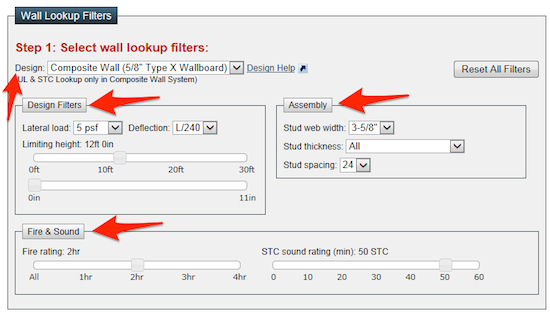
- Select Design Type: (More on Which limiting height table to use)
- Composite Wall (5/8" Type X Wallboard)
- Non-Composite Wall (Fully Braced)
- Non-Composite Wall (Braced @ 48"o.c.)
- Select Design Filters:
- Deflection (Recommend L/240)
- Lateral Load (Interior walls are typically 5psf)
- Limiting Height - Slide ft (foot) and in (inches) sliders to required height
- Select the Assembly filters:
- Stud Web Width (3-5/8” is most common)
- Stud Thickness
- Stud Spacing (Defaulted to 24"o.c.)
- If Design Type = Composite Wall, slide the Fire Rating and/or STC Sound Rating to wall requirements.
Step 2 – Select Wall System
(For Composite Wall Design)
- Click on the button in the Wall System column that meets your requirements (As shown below)
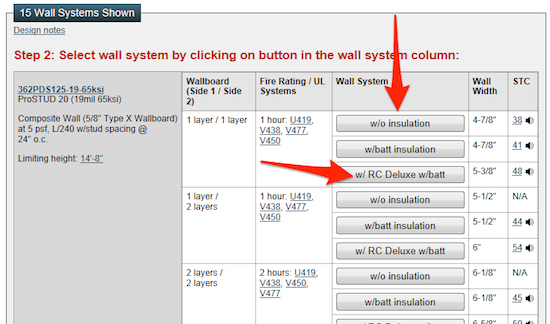
From here you can also select on the UL or STC values for test report links and notes.
The STC sound icons can also be clicked on to simulate tones to help reference frequency differences between STC ratings.
- Wall Systems that list STC ratings as "N/A" have not been tested yet.
- All STC ratings are base on stud spacing of 24”o.c.
- 16”o.c. & 12”o.c. STC ratings are an interpolation of 24”o.c. STC ratings. (Based on Veneklasen Associates, Inc. acoustical analysis)
- 3-1/2”, 4”, 5-1/2” and 6” stud depths STC ratings are based on sound testing conducted on 3-5/8” stud depth. Studs wider than 3-5/8” may result in better STC points. (Based on Veneklasen Associates, Inc. acoustical analysis)
- If the Wall System you selected has multiple UL Systems you will be asked which UL Systems to append to this wall type.
(For Non-Composite Wall Designs)
- Select wall system by clicking on limiting height button that meets your requirements (As shown below)
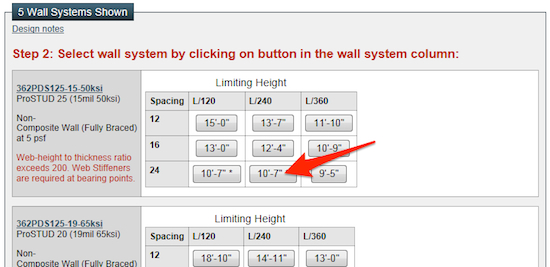
- You will then be asked for:
- Wallboard thickness
- Desired number of layers of wallboard to be placed on the wall type
- Wall System Type (w/o insulation, w/batt insulation or w/RC Deluxe w/batt)
Step 3 – Wall Type Info & User Editable Fields
If required you can update the callouts that will be listed in the wall type properties for:
- Description
- Type Comments
- Type Mark
Step 5 – Build Wall Type
You have two options for building the wall type:
- “Create in Current Project” (Default selection) – This will build the wall type right into your current Revit Basic Walls. Once complete you can select an existing wall in your project and Modify it by selecting your new built wall type. Or you can start laying out your new wall type by selecting it in the Place Wall Revit command.
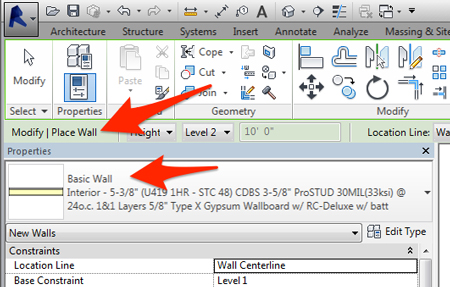
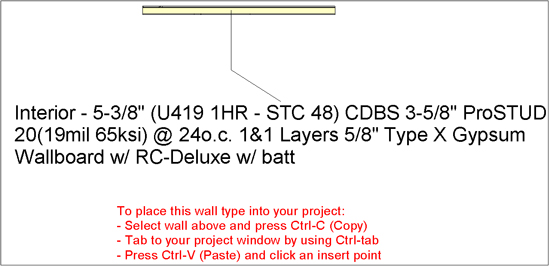
- “Create in Template” (Show below) – This will build the wall type inside Revit as a new project. This will keep your current project families clean until you require the wall types. You can copy and paste the wall types from project to project as noted in the template.
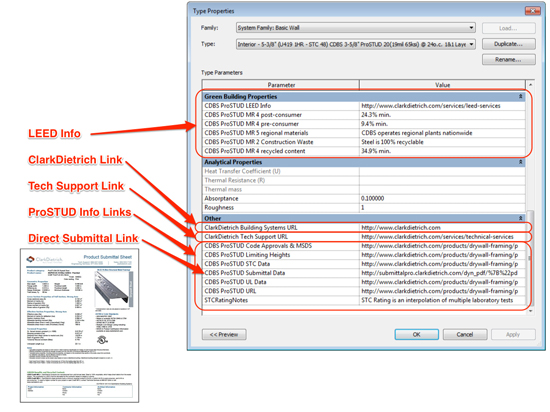
Information stored into walls created by ClarkDietrich Wall Type Creator:
ClarkDietrich Wall Type Creator develops information-rich wall types, with specific details on UL, STC, limiting heights, LEED info and Submittal links. Below is an example of the information built into the wall type properties:

Contact for more information:
- Please forward your feedback on the BIM Wall Type Creator System directly to us at BIMinfo@clarkdietrich.com. Or contact ClarkDietrich Engineering about their BIM Services, by email BIMinfo@clarkdietrich.com or call (877) 832-3206.
Version History:
Oct 11, 2021 – V2.0.16
- Updated for Revit® 2018 - 2022
Sep 25, 2020 – V2.0.15
- Updated for Revit® 2018 - 2021
July 31, 2017 – V2.0.13
- Updated for Revit® 2018
Sep 16, 2016 – V2.0.12
- Updated for Revit® 2017
July 28, 2015 – V2.0.10
- Updated for Revit® 2016
- Added ability to start placing wall type right after it's created
August 11, 2014 – V2.0.3 - User Interface Redesign & Revit® 2015 version
- Download moved to Autodesk® Revit® Exchange Store
- Complete redesign using the ClarkDietrich iProSTUD.com web interface system, allowing the user to see all system results and filter them down by: Design, Assembly, Fire Rating & STC Sound Rating.
- Direct links to:
- UL Design Reports
- STC Sound Test
- ProSTUD Product Submittals
- STC simulated tones to help reference frequency differences between STC ratings
- Discontinuing 2012 version
Aug. 30, 2013 – Wall Type Creator for Revit® 2014 released:
- New Revit® 2014 version
- Now includes 25 more STC sound tests. Over 75 in total. See ProSTUD Sound Rated Systems web page for more details.
- STC sound tests for 30mil and 33mil systems
- Updated Revit® 2013 version also
Jan. 16, 2013 - New Wall Type Creator updates:
- Now includes ProSTUD 20 (19mil) (30mil) and (33mil) systems
- You now have the ability to build a wall type right into your current project
- The Revit® 2012 Wall Type Creator has be updated also. (Just click on the "Check for Updates" button in the 2012 Add-on)
- We are discontinuing the Revit® 2011 Wall Type Creator Add-on.
April 6, 2011 – First introduction to Wall Type Creator Add-On for Revit® 2011
Software License Agreement
Before installing the ClarkDietrich Wall Type Creator Add-In the user agrees to the terms outlined in the Software License Agreement. This agreement is also shown before the installation of the Add-In.
UNINSTALLING CLARKDIETRICH WALL TYPE CREATOR:
If you are having issues with this Add-In Tool, place contact us so we can better help you and our users in the future. E-mail us at: BIMinfo@clarkdietrich.com or call (877) 832-3206.
To uninstall this Add-In from Revit’s Toolbar:
- First close Revit
- Use Windows Control Panel / Program and Features
- Right Click on the Name: “ClarkDietrich Wall Type Creator”
- Select Uninstall
- The Add-In Tool will be removed from your Revit’s Toolbar
Or you can simply rerun the ClarkDietrich Wall Type Creator installer from the Autodesk Exchange Store, and select the "Uninstall" button.